结论 volatile的作用:
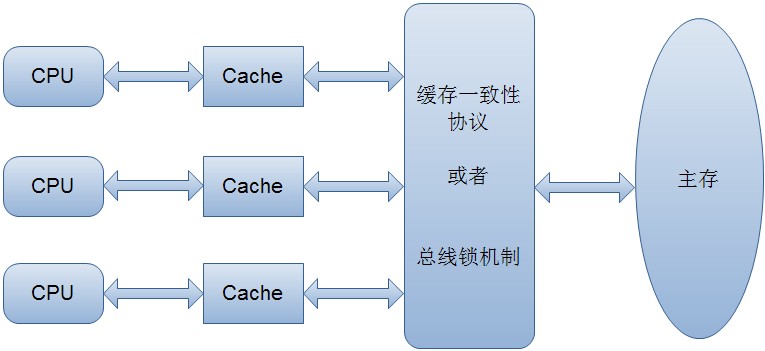
1.保证多个线程”同时”修改”共享”变量时不会因为cpu cache等原因而造成不一致,
2.另外的作用就是防止指令重排
防止指令重排 Double-Checked Locking中实例必须可以通过加上volatile关键字来防止防止指令重排产生的影响.
1 2 3 4 5 6 7 8 9 10 11 12 13 14 15 class Foo private volatile Helper helper = null ; public Helper getHelper () if (helper == null ) { synchronized (this ) { if (helper == null ) helper = new Helper(); } } return helper; } }
实现原理 字节码 查看编译后的字节码:
1
2
3
4
5
6
7
8
9
10
11
12
13
14
15
16
17
18
19
20
21
22
23
24
25
26
27
28
29
30
31
32
33
34
35
36
37
38
39
40
41
42
43
44
45
46
47
48
49
50
51
52
53
54
55
56
57
58
59
60
61
62
63
64
65
66
67
68
69
70
71
72
73
74
75
76
77
78
79
80
81
82
83
84
85
86
87
88
89
90
91
92
93
94
95
96
97
98
99
100
101
102
103
104
105
106
107
108
109
110
111
112
113
114
➜ jvm javap -v -p Foo Classfile /home/qishengli/test/jvm/Foo.class Last modified Jul 8, 2018; size 521 bytes MD5 checksum 1bacc25f9d4c0bf1b0b5c0f46172767f Compiled from "Foo.java" class Foo minor version: 0 major version: 52 flags: ACC_SUPER Constant pool: #1 = Methodref #6.#22 // java/lang/Object."<init>":()V #2 = Fieldref #5.#23 // Foo.helper:LFoo$Helper; #3 = Class #24 // Foo$Helper #4 = Methodref #3.#25 // Foo$Helper."<init>":(LFoo;)V #5 = Class #26 // Foo #6 = Class #27 // java/lang/Object #7 = Utf8 Helper #8 = Utf8 InnerClasses #9 = Utf8 helper #10 = Utf8 LFoo$Helper; #11 = Utf8 <init> #12 = Utf8 ()V #13 = Utf8 Code #14 = Utf8 LineNumberTable #15 = Utf8 getHelper #16 = Utf8 ()LFoo$Helper; #17 = Utf8 StackMapTable #18 = Class #27 // java/lang/Object #19 = Class #28 // java/lang/Throwable #20 = Utf8 SourceFile #21 = Utf8 Foo.java #22 = NameAndType #11:#12 // "<init>":()V #23 = NameAndType #9:#10 // helper:LFoo$Helper; #24 = Utf8 Foo$Helper #25 = NameAndType #11:#29 // "<init>":(LFoo;)V #26 = Utf8 Foo #27 = Utf8 java/lang/Object #28 = Utf8 java/lang/Throwable #29 = Utf8 (LFoo;)V { private volatile Foo$Helper helper; descriptor: LFoo$Helper; flags: ACC_PRIVATE, ACC_VOLATILE Foo(); descriptor: ()V flags: Code: stack=2, locals=1, args_size=1 0: aload_0 1: invokespecial #1 // Method java/lang/Object."<init>":()V 4: aload_0 5: aconst_null 6: putfield #2 // Field helper:LFoo$Helper; 9: return LineNumberTable: line 1: 0 line 2: 4 public Foo$Helper getHelper(); descriptor: ()LFoo$Helper; flags: ACC_PUBLIC Code: stack=4, locals=3, args_size=1 0: aload_0 1: getfield #2 // Field helper:LFoo$Helper; 4: ifnonnull 40 7: aload_0 8: dup 9: astore_1 10: monitorenter 11: aload_0 12: getfield #2 // Field helper:LFoo$Helper; 15: ifnonnull 30 18: aload_0 19: new #3 // class Foo$Helper 22: dup 23: aload_0 24: invokespecial #4 // Method Foo$Helper."<init>":(LFoo;)V 27: putfield #2 // Field helper:LFoo$Helper; 30: aload_1 31: monitorexit 32: goto 40 35: astore_2 36: aload_1 37: monitorexit 38: aload_2 39: athrow 40: aload_0 41: getfield #2 // Field helper:LFoo$Helper; 44: areturn Exception table: from to target type 11 32 35 any 35 38 35 any LineNumberTable: line 4: 0 line 5: 7 line 6: 11 line 7: 18 line 9: 30 line 11: 40 StackMapTable: number_of_entries = 3 frame_type = 252 /* append */ offset_delta = 30 locals = [ class java/lang/Object ] frame_type = 68 /* same_locals_1_stack_item */ stack = [ class java/lang/Throwable ] frame_type = 250 /* chop */ offset_delta = 4 } SourceFile: "Foo.java" InnerClasses: #7= #3 of #5; //Helper=class Foo$Helper of class Foo
去掉volatile关键字, 后对比生成的字节码:
可见只是多了一个访问的表示ACC_VOLATILE
从The Java® Virtual Machine Specification中可以找到如下的说明:
ACC_VOLATILE 0x0040 Declared volatile; cannot be cached;
既然字节码层面找不到太多的蛛丝马迹, 我们来看看汇编的代码
汇编代码 要查看汇编代码需要用到一个叫做hsdis(A HotSpot plugin for disassembling dynamically generated code.)的工具, 这个工具可以自己下载openjdk的代码编译, 也可以下载别人已经编译好的.
openjdk中对应的源码:
1
2
3
4
5
6
7
➜ jvm locate hsdis /home/qishengli/openjdk-8-src-b132-03_mar_2014-master/openjdk/hotspot/src/share/tools/hsdis /home/qishengli/openjdk-8-src-b132-03_mar_2014-master/openjdk/hotspot/src/share/tools/hsdis/Makefile /home/qishengli/openjdk-8-src-b132-03_mar_2014-master/openjdk/hotspot/src/share/tools/hsdis/README /home/qishengli/openjdk-8-src-b132-03_mar_2014-master/openjdk/hotspot/src/share/tools/hsdis/hsdis-demo.c /home/qishengli/openjdk-8-src-b132-03_mar_2014-master/openjdk/hotspot/src/share/tools/hsdis/hsdis.c /home/qishengli/openjdk-8-src-b132-03_mar_2014-master/openjdk/hotspot/src/share/tools/hsdis/hsdis.h
编译时需要下载binutils-2.19.1, 编译命令如下:
1
2
3
➜ hsdis ls binutils-2.19.1 binutils-2.19.1.tar.bz2 build hsdis.c hsdis-demo.c hsdis.h Makefile README ➜ hsdis sudo make BINUTILS=binutils-2.19.1 ARCH=amd64
不过binutils的编译配置中, 如果用的是gcc编译会把所有的warning当作error, 可以看到config.log的输出1 cc1: all warnings being treated as errors
强行替换-Werror为’’:
1 find . -type f -name "包含-Werror的文件" | xargs -I{} sudo sed -i "s#-Werror##g" {}
再编译就好了!
至于安装, 他的README中已经说的很清楚了
1
2
3
4
5
6
7
8
9
10
11
12
13
14
15
16
17
18
19
20
21
22
23
* Installing Products are named like build/$OS-$LIBARCH/hsdis-$LIBARCH.so. You can install them on your LD_LIBRARY_PATH, or inside of your JRE/JDK. The search path in the JVM is: 1. <home>/jre/lib/<arch>/<vm>/libhsdis-<arch>.so 2. <home>/jre/lib/<arch>/<vm>/hsdis-<arch>.so 3. <home>/jre/lib/<arch>/hsdis-<arch>.so 4. hsdis-<arch>.so (using LD_LIBRARY_PATH) Note that there's a bug in hotspot versions prior to hs22 that causes steps 2 and 3 to fail when used with JDK7. Now test: export LD_LIBRARY_PATH .../hsdis/build/$OS-$LIBARCH:$LD_LIBRARY_PATH dargs='-XX:+UnlockDiagnosticVMOptions -XX:+PrintAssembly' dargs=$dargs' -XX:PrintAssemblyOptions=hsdis-print-bytes' java $dargs -Xbatch CompileCommand=print,*String.hashCode HelloWorld If the product mode of the JVM does not accept -XX:+PrintAssembly, you do not have a version new enough to use the hsdis plugin.
安装就是放到jvm能够加载到的路径上, 然后在jvm的启动参数中加入-XX:+PrintAssembly -Xcomp
参数-Xcomp是让虚拟机以编译模式执行代码,这样代码可以偷懒,不需要执行足够次数来预热都能触发JIT编译。
可以看到输出:
1
2
3
4
5
6
7
8
9
0x00007f29294c0054: mov %r12d,0xc(%rbp) 0x00007f29294c0058: lock addl $0x0,(%rsp) ;*putfield helper ; - com.air.jvm.VolatileTest$Foo::<init>@6 (line 40) //... 0x00007f2929504fdc: shr $0x9,%rax 0x00007f2929504fe0: mov $0x7f2924e3f000,%rdi 0x00007f2929504fea: movb $0x0,(%rax,%rdi,1) 0x00007f2929504fee: lock addl $0x0,(%rsp) ;*putfield helper ; - com.air.jvm.VolatileTest$Foo::getHelper@27 (line 45)
可以看到多出了一行 “lock addl $0x0,(%rsp)”,这行代码只是对 stack pointer 加 0,无含义。
“Synchronization mechanisms in multiple-processor systems may depend upon a strong memory-ordering model. Here, a program can use a locking instruction such as the XCHG instruction or the LOCK prefix to ensure that a read-modify-write operation on memory is carried out atomically. Locking operations typically operate like I/O operations in that they wait for all previous instructions to complete and for all buffered writes to drain to memory.”
LOCK prefix 会触发 CPU 缓存回写到内存,而后通过 CPU 缓存一致性机制,使得其它线程能够看到最新的共享变量,实现了共享变量对于所有 CPU 的可见性。
new Test()做了什么参考R大在知乎上的解答:
new Test()
创建并默认初始化一个Test类型的对象
调用Test类的signature为 ()V 的构造器
表达式的值为一个指向这个新建对家的引用。
对应到上面的字节码, 我们从同步块的monitorenter和monitorexit找到new对应的字节码如下:
1
2
3
4
5
6
7
8
9
10
11
12
13
14
10 : monitorenter11 : aload_012: getfield #2 // Field helper:LFoo$Helper; 15 : ifnonnull 30 18 : aload_019: new #3 // class Foo$Helper 22 : dup23 : aload_024: invokespecial #4 // Method Foo$Helper."<init>":(LFoo;)V 27: putfield #2 // Field helper:LFoo$Helper; 30 : aload_131 : monitorexit
稍微补充下字节码的指令知识:
aload_0 获取的是本地变量表中对象的引用,a代表引用类型,0表示本地表量表中变量的索引,通常0这个位置的引用,一般都是 this 对象。iload_0 获取的是 下标为 0 的整数类型。
因为new操作并不是一个原子的操作, 他是分了三步的, 如果没有volatile, 这里就有可能发生重排序, 导致另外的线程拿到的是一个初始化了一半的对象.
JMM规范 JMM(JSR-133)规定了每个线程都有一个工作内存,
Every thread is defined to have a working memory (an abstraction of caches and registers) in which to store values.
参考